
Polar lights USS Enterprise NCC-1701
Star Trek The Motion Picture Refit
1/350th Scale


 Page Number
And now...
Some Secondary Hull Sodding About!
Okedoke then gang, we're off again lords save us all.
Now before we bloody start, a word...
or several...
about the Orbital Drydock Masking set.
Now let's face it, the paint job on the Refit Enterprise is no pushover.
I have heard and read it from more than one modeler that it's the 'grail' of ST modeling finishes.
Can't speak to that meself but...
To be absolutely honest, it's a bit of a nut crusher if you want to go the whole hog with the 5 colour route.
Even doing a 2 colour job is enough of an exercise in sanity stretching.
That said, if you are willing to go for it as this model deserves in my humble opinion,
the the Orbital Drydock masking set is for you.
It's a balance of priorities for most with work vs. cost and I can appreciate that.
Cutting your own masks will entail less cost I grant you and if time is not a factor then okedoke.
But if it's a fair measure of sharpness, accuracy and time saving is your agenda then get the set.
When I do my next and last 350th refit, I will be getting the 5 colour set again for that no arguments.
Your opinion may vary but that's my take on it for whatever it's worth.
Onward!
So the secondary hull and neck nonsense now.
Usual deal of good scrub and rinse then in with the white auto primer and left for a couple of days to settle down proper.
Grey enamel wash and a brisk rubdown with a thinner soaked rag later get's us this.


Masking tape and kitchen paper towels to keep the air propelled pearlescent in check and let's have at it!

Pulled the appropriate sheet from the masking set and got busy with a red, green and blue Sharpie marker
so I would know which parts to plaster the paint on.
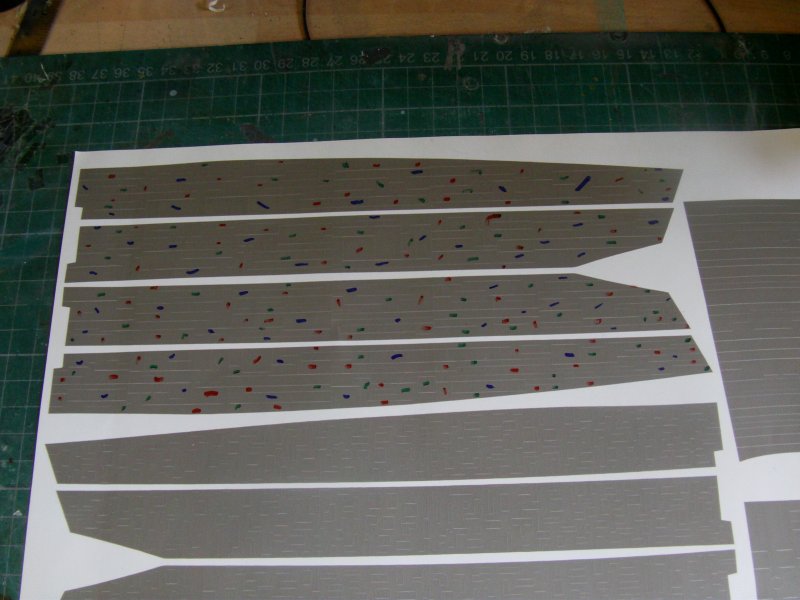
Now decided to make use of the masks that would normally be for the 1701-A secondary hull.
This is more a patchwork kinda deal since the secondary hull got a major repaint when it be4came the -A.
They look like this...

So masks duly applied and a light coat of Tamiya pearl clear.
Masks removed an a look see had.


More than good enough for a base.
So to the proper masks.
Now referring to the Trek Modeler Paint Guide for the refit and my own ref,
the OD masks are a bit more complex in the pattern.
This is no bad thing in my opinion and as noted before, the mask set will get you close or at least close enough IMHO.
That said, let's get to the meat of the matter...
Masks applied and I did not use the transfer tape method as supplied in the masking set.
Reason for that is that the masks are going on to matt paint on this model
and the masks simply do not have that strong an adhesive to pull off of the transfer film supplied,
no matter how much I rubbed them on my t-shirt or whatever other method of lessening the tack I tried.
In short, the Refit is matt white as a base colour but for others,
I would at least recommend a semi matt/satin finish on the base white to help to get the masks to stick using the transfer tape.
For my own uses, I found a couple of no brand, dirt cheap, low tack rolls of
masking tape and believe me it is low tack as well.
All that said it's builders choice and it's your ship to do as you wish in the end
no matter what anyone else thinks.
Where was I?
Oh yeah, the masks applied...

So a simple deal and a steady hand..
which I don't really have that much these days...
And remove the first colour areas you want.

Spray pearl, let dry, put mask bits back, repeat for next colour etc.

Blue, red and green done.
Areas for gold removed and airbrushed, when cured proper, all masking removed.

Have a look see about...


And then left that for the night and next day when some decent light coming through the door
of the Hellhole was there, we got this.


And the same gig for the other side of the hull.


Nice!
So again with the masks for the top of the hangar bay and after a fair amount of gold with a bit of green and blue, we got this.


And it shows the tones off nicely when shot in black and white...or grey scale if you will.

So that done, on to the belly areas!
The very necessary masks.

So in stages:
Masks applied and four passes with the gold.

Remove a few panels and two coats.

Remove some more and another two coats.

A last couple taken off and two last coats.

All masks removed.


The toning shows up very nicely in grey scale.

After all that, dial the pressure right down and small friskets done for small detail bits in gold.


And all masking removed for a good look see.


And the same kinda deal on the other side done.


That's about what one was after.
Next update: Last of the belly paintwork, the neck thingy that the saucer sits on, strongback, deflector housing and finishing detail paintwork.
See you merry mob then and go easy out there all!
Page Number