
Polar lights USS Enterprise NCC-1701
Star Trek The Motion Picture Refit
1/350th Scale


 Page Number
The final frontier with a bit of the right stuff perhaps?
Or To Put It Another Way, It's The Final Stuff!!
So onward with the rest, last bit for the pearl on the rear.

And on the front end.


Other paintwork now.
The rear end and RCS bit.
Special mix acrylic blue for the stick out the back thing
and acrylic carmine red and desert yellow used for the RCS parts.


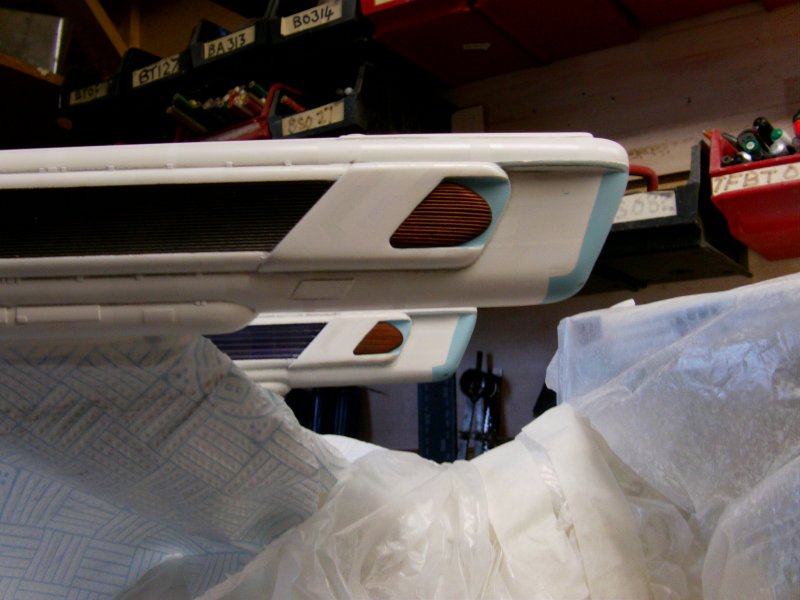
Grilles either side now, matt acrylic german grey airbrushed with acrylic steel drybrush for the outer grille.


Inner warp grille.
Acrylic matt black laid on long ago,
this cleaned and a decent coat of 50/50 mix pearl blue with pearl red airbrushed on.
This would give them the slight purple sheen colour required.


Bussard front colours on and my own resin cast side grille thingies painted and placed.
Just acrylic matt black and drybrushed with acrylic copper.


Bussard grilles painted mit der matt black, grey drybrushed,
then shoved where they should be.


All over masking removed and registry/small markings applied to the nacelles.


Last of the paintwork/markings applied to the main model and overall cleanup where required.


Closed fantail doors painted/marked and just slid in to position.


And that my friends completes the main model hoo-ha!
At long bloody last.


So base work cleanup and detailing.
Build up of some extra support around the pole.
Sealed and the whole thing painted with semi-matt black.


The dedication plaque of DIY a photo etch brass and t'was a done thingy.

Attached to base and that's that done thingy


Time for an overall looksee methinks.


And the light up dept. also got a run.


And there ya have it.
A gallery proper and video at the button link thing below.

The Finishing Musings!
Well it's been a long, long bloody road but finally done.
So what to say, well as always and anyone who's built one of these can attest,
it can easily turn from a kit build in to an endurance trial but
that depends on how far you want to go with the Enterprise.
From the perspective of this particular finished article
it all depends if you want to go this far.
Now i'll leave alone the build techniques as such because no two people do it the same
or are as possibly insane and/or glutton for punishment as myself.
That said, on something like this, I personally believe that lighting in some form is a must have
if that final layer of "holy shit that's cool!" is your goal and this lass does deserve it.
At least to me she does though others may differ and that's perfectly ok.
With reference to the lighting effects, how I do it is just one way and by no means is it the 'only' way.
I only do it this way as it means no small or large alterations to the
ship that differs from how the overall design appears on screen
and no exterior lighting rig as per the studio model.
My method is not better than having those, just easier to keep it as self contained as possible.
Of special note, the back lighting for the floodlights only seems to work on the original Polar Lights
issue and not the Round 2 issues due to the plastic giving a pronounced yellowing to the lighting.
Ok that waffle done, I have laid out my thoughts on the masking sets I had
at the time of furious typing so I know not about the latest version of the Aztek Dummy mask set.
For me, whether you want to go for the two colour or
five colour full on aztec, the Orbital Drydock masks are pretty much the set of choice.
Mainly as they are the most comprehensive lot I have yet seen for the Refit.
For in depth details on the paint and what goes where,
the Trek Modeler Paint Guide is a valuable resource but not the be all and end all.
One has to remember that anything is open to interpretation and
a lot of the paints that they lay out to use are not available
all over the world so some compromising/alternate solutions will have to be found.
Likewise with the pearlescent paints.
One can go with the pearl powder and clear carrier they recommend but to be honest,
just the pearl lacquer I used fitted the bill and as Paul Olsen said in his book on painting the Enterprise,
he used blue, red, green and gold pearl.
I heard or read him mentioning about the flip where it changes colour
depending on how the light hits but just went the
four colour on matt white route and that seems to have worked out nicely.
One note here, after doing more than a few builds of this beastie,
a couple documented and others not so,
I can say with hand on heart, if you are doing a straight build and work carefully,
she does not need any internal armature or bracing.
My first build from about 2006 for a friend still exists in one piece
and there is zero sagging to be seen.
Now all of the above and this whole build log is just how i've done it.
That's just me personally and how it applies to you is really your choice to follow/discard in whole or part as you see fit.
In the end, if it's no fun the it's not worth doing.
And that's quite enough outta me on this subject so you merry lot go easy out there as always!
Page Number